Refashionistas are everywhere. To see garments that are oh so blah and totally last year transformed into something awesomely today and actually wearable is a sight to behold. But not all refashion projects are created equal. Far too often I see transformations that look like a pillowcase with holes for head and arms and a belt holding it all together. Fine for a beach cover up but not a sustainable refashion and probably more wasteful than if it was just left to the rag bag.
Would you attempt to make a cake without following a recipe? So why would you attempt to draft a garment without a pattern? Refashioning doesn't have to be the lowly cousin of couture design. Remember that every garment, whether in fashion or not is a potential resource - fabric. Consider the garment and visualize what sort of pattern you could apply to it to create a refashioned masterpiece.
I was a kid in the late 50's and early 60's. Nothing said summer more than the little cotton Ship 'n Shore blouses we wore. They remain a staple in my wardrobe for their easy wear and easy care.
My husband outgrew one of my favorite shirts - a pinpoint cotton button down oxford. The fabric was in great condition and the tiny blue and white stripes would make a perfect little cotton blouse for me using the Advance pattern for a front button blouse. I carefully removed the collar buttons.
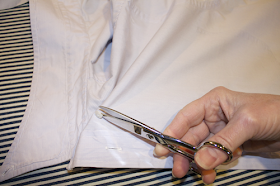
This shirt had one breast pocket and I very carefully removed it by pulling up on the threads and not ripping the seam to ensure a nice clean removal. The tiny stitches make this step a bit tedious but those tiny needle holes will vanish after a couple of washings so it is well worth the extra time. If however, you are making a blouse that has no bust darts and you want to keep the pocket, just skip this step.
Depending on the size of the shirt and the size of your pattern, you can cut the collar and sleeves off and cut the side seams. If you think you may need that little extra seam allowance for size you can carefully split the seams as I did here.
I folded the back of the shirt to resemble the fold of a length of fabric.
I laid out my pattern pieces, adjusting the position so the shirttail hem would be equal - I wanted a longer shirt than the pattern allowed. I used my nifty DIY Pattern Weights covered in Plasti-Dip. You can find the instructions to make your own set of weights HERE.
The front bodice for this pattern had a button band which I lined up with the seam allowances and pinned to the bodice piece. This helped me line up the buttonholes on the front of the shirt with the buttonhole alignment of the pattern.
Using tailors chalk I marked the front and back with cutting lines and markings for darts and tucks. Tailors chalk washes out easily and allows you to mark the entire stitching line which makes sewing straight darts a breeze.
And then simply follow your pattern instructions for sewing darts and seams. I chose to add armhole facings cut from the shirt sleeves.
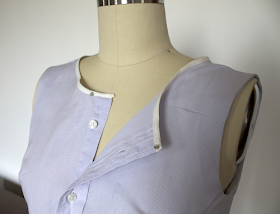
But decided on white bias tape for the neckline.
A single little snap keeps the front neckline intact.
The bias tape gives the neckline a crisp, finished look to a front buttoned blouse that didn't require any buttonholes!
This blouse buttons opposite of a woman's blouse. There are a couple of things you can do if you prefer a blouse that buttons correctly. One thing you can do is to find a much larger shirt than the size you require and simply turn the front of the shirt upside down after separating the sections. Another thing you can do is to turn the front of the blouse to the wrong side. (Inside out) For most plain weave fabrics it won't make a difference but you will have to move the buttons to this side of the shirt and be comfortable with the button band on the inside.
However you plan to refashion-up a garment, use a pattern as a guide. It may require a bit more preparation but the finished product will be something you will be proud to wear again and again.
Find vintage patterns to pair up with your next refashioning project in my CynicalGirl shop on Etsy.


What a great transformation!
ReplyDeleteBravo! Nice post. Great photos. I look like a new man.
ReplyDeleteGreat idea, and it's adorable!
ReplyDeleteVery nice blouse and thrifty as well! I agree with you about the pillowcase or bag look, some times I just shake my head and say why did they bother. Older sewing books [40s/50s/60s] always had such wonderful sections about re-making clothing just like you did here. What a lot of up-cyclers tend to do when re-making clothing is try to be as cheap on time as they are on material. If anything re-making is more expensive on time as you have to undo to redo.
ReplyDeleteThanks Anne. The "Make Do And Mend" publication from the 1940's continues to be a huge influence on me. It was published at a time when material was not so easy to come by and you re-used everything.
DeleteNeat post! I can barely sew a hem so I am in awe of seamstresses. I remember my mother telling me about how she, her sister, & my grandmother re-used clothing.
ReplyDelete